Embroidery Machine Service Guide
This Embroidery Machine Service Guide contains brief info on very basic embroidery machine repairs.
{{
{{#invoke:Namespace detect|main}}
| type = | image = {{#if:|[[file:{{{image}}}|40px|Notice]]}} | imageright = | class = | style = | textstyle =
| text = {{#if:|
}}Before attempting any service on an embroidery machine, it is recommend to first contact an embroidery machine technician.
| small = | smallimage = {{#if:|[[file:{{{image}}}|30px|Notice]]}} | smallimageright = | smalltext = | subst = {{subst:substcheck}} | date = | name = Notice }} {{
{{#invoke:Namespace detect|main}}
| type = | image = {{#if:|[[file:{{{image}}}|40px|Notice]]}} | imageright = | class = | style = | textstyle =
| text = {{#if:|
}}Generally when an operator has issues with an embroidery machine, the issues are less likely to be a mechanical problem with the machine but more than likely another factor.
| small = | smallimage = {{#if:|[[file:{{{image}}}|30px|Notice]]}} | smallimageright = | smalltext = | subst = {{subst:substcheck}} | date = | name = Notice }} {{
{{#invoke:Namespace detect|main}}
| type =
| image = {{#if:Stop_hand_nuvola_svg.png|
}}
| imageright = | class = | style = | textstyle =
| text = {{#if:|
}}Before doing anything to the machine, its recommended to run a known good design with known good thread and with only a couple pieces of backing and good scrap material to verify the problem is mechanical.
| small = yes
| smallimage = {{#if:Stop_hand_nuvola_svg.png|![]() }}
| smallimageright =
| smalltext =
| subst = {{subst:substcheck}}
| date =
| name = Notice
}}
}}
| smallimageright =
| smalltext =
| subst = {{subst:substcheck}}
| date =
| name = Notice
}}
Basic Operations
During the embroidery operations, there are certain things the operator should look for or adjust to have the machine running at optimal performance.
The embroidery troubleshooting guide can be reviewed first to verify the symptoms and resolutions offered.
Tensions
Thread Tensions are very important and probably one of the most underestimated issues in embroidery. The thread tensions should be constantly checked. The tensions can be checked hand or just by eye. As the embroidery machine is running, the operator needs to watch it every so often to make sure the embroidery looks tight but not too tight and not too loose. The tensions should also be checked when a job is done.
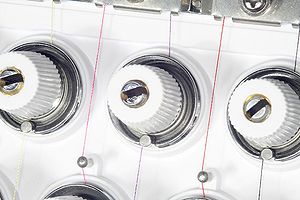
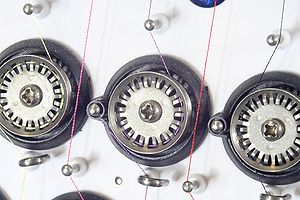
The thread tensions are set with the tension knobs at the top of the machine .
Bobbin Tensions
The bobbin tension should be adjusted when the bobbin is changed. Once the bobbin tension is set, it should not be changed again until it is replaced with another new bobbin. The bobbin tensions will effect the top thread tensions so, its best not to change the bobbin tensions too often because it will effect the tensions of all the threads at the same time. If the machine has 16 needles, all 16 needles will have their tensions slightly off if the bobbin tension is changed.
Some claim when replacing the bobbin that it should spin counter clockwise when pulling the thread through the bobbin cases. Others claims that the thread should spin clockwise. The author of this article has 20 plus years of embroidery experience and suggests the bobbin should spin counterclockwise.
Either way, the bobbin should always flow smoothly and not have any backlash when pulling or snag. If the bobbin starts snagging when pulling the thread through the case then the case is probably dirty and needs to be cleaned, repaired or replaced. Do not be afraid to replace the case every so often. They are not expensive. When replacing the bobbin case, be sure to take the small metal tab out of it unless embroidering with metal bobbin cases.
Once the bobbin is replaced, the thread should pull through with about the same consistency of 3 U$D quarters ($0.75). This means that when the thread pulls through it should feel like on the end of the thread there are 3 quarters tied and dragging across a flat surface. For operators not familiar with the weight of 3 U$D quarters, each quarter is about 2.5 cm in diameter each and about 5.5 grams each.
If the thread feels less tight than that when pulling it through the bobbin case, then the case tension screw needs to be slightly tightened (turn clockwise). Just a little bit makes a difference. A very small flat head screw driver should be used to tighten the bobbin tension. Some operators also use their fingernails.
Once the bobbin thread is replaced and the tensions are set, it should not be set again until the bobbin is replaced.
Thread Tensions
The thread tensions on the embroidery machine should be checked constantly. Do not bother setting the thread tensions without setting the bobbin tension first.
Once the bobbin tension is set, then the top thread tensions can be set.
The easiest way to set tensions properly is with the I-Test or the T-Test or the Column Test all of which are basically the same thing.
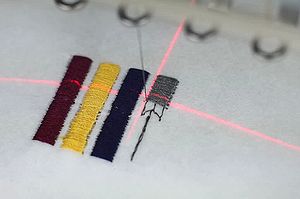
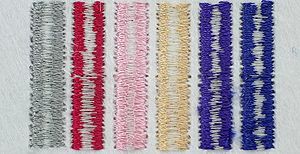
These tests are basic column stitches or straight lines of satin stitches as show in the picture. If the operator has embroidery software that has automatic lettering they can use the software to enter several letter Is or several letter Ts or any other letter with straight columns.
The tension test file should be run on a sample piece of material and about 2 pieces of cut-a-way backing.
While the test file is being embroidered, the operator should stop the machine every 20 stitches or so, perform a Trim Command on the machine control panel and then remove the hoop from the machine. The operator should look on the bottom of the material to see how much thread to bobbin is showing on the bottom of the columns. About 1/3 of the column should be thread color, then the next 1/3 should be bobbin and the remaining 1/3 should be top thread color.
Notice on the image that the grey thread (far left) has less bobbin than thread on either side. The red color (2nd from left) has about 1/3 red (top thread) followed by 1/3 white (bobbin) and 1/3 red (top thread). The grey is showing too much thread color and not enough bobbin. However the red color is showing correct thread tensions.
In order to adjust the grey, the top thread tensions knob should be tightened slightly (about 1/4 turn). Once the tension is tightened a bit for the grey color, the operator should embroidery another 20 stitches or so and check the tensions again and adjust if needed.
Assuming the bobbin thread tension is already set:
- When too much top thread is shown, the top tension should be tightened.
- When too much bobbin thread is shown, the top tension should be loosened.
Once the tensions are set for all needles as above, an experienced operator should be able to set the tensions while the machine is running. When the thread looks too loose, the tension should be tightened a bit. When the thread looks too tight, the tension knobs should be loosened a bit.
Changes should only be made about 1/4 turn at a time. It usually easiest to lower the machines speed to the slowest speed while setting tensions until the embroidery output looks good, then the machine can be resumed its normal embroidery speed.
False Thread Breaks
False Thread Breaks are when the machine stops for a thread break but, the thread is not broken.
Usually false thread breaks occur when the machine is not properly threaded.
Common Adjustments
Needle Depth
The Needle Depth is how far the needle goes down at it max low point. If the needle goes too low, it can break and if the needle does not go far enough, the machine might break threads or skip stitches.
There are 2 ways to set the Needle Depth. The needle depth can be set by eye or, with a needle depth gauge.
Below is a video example on how to set the Needle Depth on a Butterfly embroidery machine using both the depth gauge tool and another video without the tool.
{{#ev:youtube|begtl_cPlvE|300|center|Butterfly Needle Depth Adjustment}}{{#ev:youtube|bdD4_2K3UXE|300|center|Butterfly Needle Depth Adjustment}}
Hook Timing
Hook Timing is when the hook point and the needle point meet so that the hook can grab the thread and make the embroidery stitches.
If the hook timing is off the machine might not make stitches, break threads and/or needles.
Below is a video example on how to set the Hook Timing on a Butterfly embroidery machine.
{{#ev:youtube|iWRrzCqGK3g|300|center|Butterfly Hook Timing Adjustment}}
Needle Stop Position
See Also
{{#ev:youtube|9R73TFInNEQ|200|right|Butterfly Promo Vide}} For more service videos, visit the Butterfly YouTube site


