Embroidery Machine Accessories
There are several different types of Embroidery Machine Accessories. The Embroidery Machine Accessories are used for making it easier to embroider on different types of garments. For example, there are accessories for embroidering on caps and there are different accessories for embroidering jacket backs and different accessories for embroidery on shirt fronts.
When embroidering on different materials, it might be necessary to change the needles.
Types of Embroidery Machine Accessories
There are a lot of Embroidery Machine Accessories one might use when embroidering on different types of garments or materials.
The garment should be tight inside the hoop and the fibers or threads of the materials should all be seen running parallel and perpendicular to each other. In other words, the material needs to be flat and not be stretched one direction or another.
Some of the common types of Embroidery Machine Accessories might include:
- Hoops
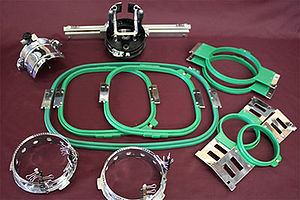
- There are several different types of hoops and hoop sizes. Generally its best to use the smallest hoop available for the logo and garment. Larger hoops for small embroidery might cause distortions.
Some types of embroidery machine hoops include might include Tubular Hoops, Spider Hoops, Magnetic Hoops, Jacket Back Hoops, etc
- Cap/Hat Frame
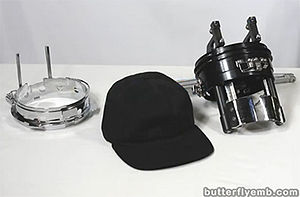
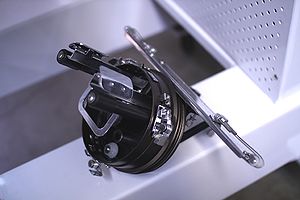
- The Cap/Hat frame is used when embroidery on the front of a cap. To embroidery on the back of a cap, its recommended to use a tubular hoops. The Cap / Hat frame requires a cap/hat driver. The cap driver is specific for each make and model of machine. The cap frame attaches to the cap driver and the cap driver attaches to the machine. Cap frames are then placed and removed from the cap driver.
{{
{{#invoke:Namespace detect|main}}
| type = | image = {{#if:|[[file:{{{image}}}|40px|Notice]]}} | imageright = | class = | style = | textstyle =
| text = {{#if:|
}} Depending on the machine, changing from one accessory to another (example: Caps to Tubular hoops) might take a little while, especially on large multihead machines. Some operators like to have specific days just for caps and other days just for shirts or, the morning for embroidering on caps and the afternoon for the tubular hoop goods.
| small = | smallimage = {{#if:|[[file:{{{image}}}|30px|Notice]]}} | smallimageright = | smalltext = | subst = {{subst:substcheck}} | date = | name = Notice }}
- Workable Table Top
- Most smaller machines (usually 6 heads or less), have table tops that can removed. These table tops are usually made of wood. The table tops are usually not used unless the operator is embroidering something large or heavy. Most the time the table top is removed and the tubular attachment is installed. When the tubular system is in use and the table top is removed, the garments can hang down and do not end up getting in the way of the working embroidery area. The table top must be removed when embroidering caps. Many large, newer machines have hydraulic tables that can go up and down. Some larger machines also have removable tables that have to be removed in several parts and usually require 2 people to remove them.
- Embroidery Machine Stands
- Single head machines sometimes have optional Embroidery Machine Stands with a cut out in the front to allow garments to hang while embroidering. The stands usually also have wheels to roll around and leveling feet to level the machine and stand. It is very important that the stand remain level.
Hoops and Hooping
Embroidery hoops are clamping devices used to hold the backing and fabric in place when using the embroidery machine. Modern hoops for embroidery machines are typically made of plastic and metal. By placing the fabric in a hoop, the fabric stays in place and the hoop moves as controlled by the machine. Hooping the garment correctly is an important part of the embroidery process.
Types of Hoops
Tubular. The Tubular Hoops are the most popular or common types of hoops currently used. Tubular hoops systems are relatively new in the embroidery industry and were introduced in the early 1990s. When this type of hoop is used the machine's workable table top is dropped or removed. Tubular hoops snap into a tubular sash and allow the fabric to flow freely. This makes it easier to embroider on finished garments. Tubular hoops are usually quick to load and unload and are usually easier to hoop which has made them very popular.
Flat. This type of hoop is used when the machine table is in the up position. There are special framing systems that allow you to load and unload these hoops with ease. Flat hoops are typically used for unfinished garments or fabric.
Hoop Sizes
Listed below are some common hoop sizes and their recommended usage:
4-inch or 12cm round hoops. These hoops are used for small shirt-front or jacket-front embroidery such as personalization, hemmed sleeves, shorts and more.
6-inch or 15cm round hoops. These hoops are commonly used for embroidery over shirt pockets because they allow the embroiderer to keep the bulky pocket seams inside the hoop. In other words, even when a logo or design will fit inside a four-inch hoop, the pocket area can be trooped straighter and flatter when the hoop falls outside the pocket corners. These hoops are also used for blazer crests, aprons and jackets.
8-inch or 19cm round hoops. These hoops are most commonly used as a base to hold a spider or distancing insert for quick-change hooping systems. In this system, the hoop that holds the garment is snapped into (not screwed into) the spider which holds it
Selecting the Appropriate Hoop
Select the smallest hoop possible. Use the smallest hoop possible (that fits the design) in order to ensure that tension is even across the fabric. Make sure to leave at least a half-inch (1.27cm) on all sides of the design. This will enable good design registration.
Select the right shape. Most hoops are round or oval so this is not usually a problem. The rounded shape provides for more even tension on the fabric.
Use hoop of an appropriate material. Most hoops are made of plastic so this is not a major concern. Some are made of wood and there are some cap frames and specialty hoops that are made of metal. Special hoops made of wood called Double-Height hoops are used to hold heavy or slippery fabrics.
Care of Hoops
Hang up hoops when not in use. If they are left flat they can become warped or get chipped. Do not store in direct sunlight.
Hold the metal bar to insert hoops. When inserting the hoops into the machine do not push the wood or plastic. Instead, hold the metal bar or brackets and insert into the machine.
Mark the hoop. This way you can always keep the top and bottom pieces together.
Adjusting screw. The small adjusting screw is usually the first item to break on plastic hoops. The adjusting screw can be tightened by hand or with pliers but be sure not to overtighten - it is bad for the garment and the hoop.
Guidelines for Hooping
Make sure the backing is large enough to fill the entire hoop. By hooping the entire piece of backing, you will better maintain even tension on the garment.
Smooth out the garment and backing. Do this before placing the hoop and make sure there are no folds or wrinkles in the garment once it is hooped.
Stretch the garment. Stretch the garment to how it will be worn before hooping it. If the garment stretches when it is worn, it will make the fabric around the embroidery look puckered.
Adjust the hoop before hooping. Do not tighten the screw after hooping the garment or it may cause "hoop burn" on the garment or cause the design to register poorly.
Marking the garment. Mark the garment with tailor's chalk, masking tape, straight pins or marking pens. This will help show you where the center of the design should start. If you are sewing many of the same garment you may be able to mark the first one, then use the hoop itself as a guideline for the remainder of the items to be embroidered.
Placement Guidelines
Left Chest. Center straight down from the shoulder seams 6-8" (15.2-20.3cm) and over 4-5" (10.1-12.7cm)
Shirt Pockets. Center between the seams of the pocket down from the edge
Jacket Backs. The center of the design should be about 6-9" (15.2-22.8cm) down from the collar
Cap / Hat Accessories
Most machines have the ability for embroidering on cap fronts
There are 2 types of cap frames used in embroidery. Today, the standard cap frame is the 270 degree cap frame which allows operators to embroidery on 270 degree area of the cap. This is basically ear to ear. The older version is know as the Standard Cap Frame. The older version only embroiders on the front of the cap and not the sides.
To embroider on the back of a cap above the size adjustment strap, most all embroiderers just use the standard tubular hoops and hoop the cap back as if it were just a regular flat embroidery piece.
In order to use either the 270 or the standard cap frame, the embroidery machine needs to have the ability to embroider on caps with all the cap driver equipment
Basic Measurement Conversions
Below are a few of the English to Metric conversions for various common hoop sizes.
Many of these measurements have been rounded.
| English | Metric |
|---|---|
| 0.394 Inch | 1 CM |
| 1 Inch | 2.54 CM |
| 3.54 Inch | 9 CM |
| 4.72 Inch | 12 CM |
| 5.90 Inch | 15 CM |


