Digitizing
Embroidery Digitizing is the art of taking a logo or any graphical image and converting it into digital points that can be read by an embroidery machine. Generally, a digitizer digitizes an embroidery design using a computer software program tools to plot these points. The points are then converted into stitches by the software and then saved to an embroidery software format which the embroidery machine can process. The final embroidery file tells the machine in which direction to move the frame for each stitch. Digitizing a design is an essential part of modern machine embroidery.
Digitizer
An Embroidery Digitizer is someone who takes an image or a graphic and converts that image or graphic into embroidery stitches using a digitizing software package. A digitizer has tools in the software that allow them to create many different types of stitches.
Less commonly, a digitizer might just be referred to as the embroidery software or embroidery computer program.
for a looser definition on the general term Digitizing see http://en.wikipedia.org/wiki/Digitizing
History
Before embroidery machines were run by computers, all embroidery was done by hand by moving the garment manually as the needle moved up and down creating the stitch. Around the late 1970s Embroidery Machines were then equipped with X and Y motors which moved the garments left and right and back and forward. The X and Y movements were controlled by software programs also known as digitized designs or digitized logos.
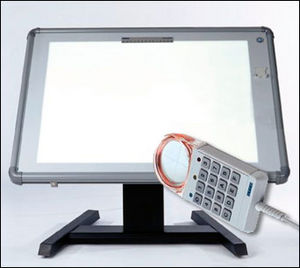
In the late 1970s till around the late 1990s, all digitizing was done on a large tablet with a puck. The large tablet was generally about the size of a small dinner table. The tablets were typically white and on a stand so that they would be stood up at a slight angle where the digitizer could sit in front of it. The tablets look similar to a white board. The tablets were attached to a computer. An embroidery artist (sometimes the digitizer) would then hand draw the logo by about 10 times the size of the final embroidery product, usually on heavier stock paper or something that might look like project board or poster board. Using colored pencils the artist might also color in parts of the drawing so the digitizer knew what colors each part of the logo was supposed to be. The artist might also pencil in various notes on the paper for the digitizer. Due to the width of an embroidery stitch or embroidery thread and the garment fibers, very fine detail is sometimes hard to achieve with embroidery. A good embroidery artist would remove or enlarge parts of the image that were too small for embroidery stitches. They might also add reference lines or marks for the digitizer. The large paper was then handed to the digitizer who would meticulously tape the paper to the digitizing tablet using masking tape or a tape easy to remove. It was very important that the design was not only taped perfectly level to the table but that the corners and center points were marked as well. At this time computer software was not available to move, rotate or recenter the image so if the paper was not taped just perfectly, the final embroidery product would not be perfectly squared either. The reference marks were made so that if the digitizer had to take the paper off their tablet, they would know exactly where to put it back on if they needed to stop in the middle of a design. The papers were usually rolled up or folded and saved.
Once the digitizer had their design taped to the table, they would use the puck to start plotting each stitch one by one. The puck looked very similar to a computer mouse with cross hairs and many more buttons. A digitizer might place the puck at one point of the design, then click a button, then move the puck again and click the button again. Each time the digitizer clicked the button on the puck, a stitch was made. During the early years of digitizing, the tablet was directly connect to a paper tape punch machine. The paper tape looked like a roll of masking tape or something similar but was only paper. Each time a stitch was made with the puck the paper tape was immediately punch a hole. These punched holes would tell the machine which way to move the X and Y axises before placing the point. If the digitizer made a mistake with their stitches, they would have to physically find the holes on the paper tape that corresponded to those stitches and tape them up and then re-punch new holes with a paper tape hole punch device. The paper tapes were also the only copy of the design available. Computers did not have storage space and floppy disk were not yet affordable. If the paper tape was lost or damaged, then the design would be lost and the digitizer would have to re-digitize it. These paper tapes were usually labeled and stored away for future use. Sometimes the term punching or punch a tape might be used to refer to the act of digitizing. This term now is generally only used by the people who have been in the embroidery business a long time.
Years later around the early 1980s once PCs started becoming more advanced, the data points were saved on the PC and once the entire design was completed the paper tape could be made. Further advancements were later added like on screen editing where a digitizer could move points around that have already been digitized, rather then finding the hole in the paper tape and physically making new holes. Paper tapes soon after were replaced by floppy disks. The digitizing process because a little easier over the years too. Instead of having to digitize each and every stitches for example, a digitizer could use their puck to plot 4 points of a box and the software would automatically fill the box in with stitches. Instead of having to plot many points, digitizers could then just create basic shapes and the computer would fill in the rest. On-screen editing began to be much more popular which means a digitizer could quickly plot these points without being entirely accurate and then go to the PC and adjust the points by hand, using a mouse which was much faster than meticulously placing each point with the puck. Most digitizers would quickly digitize a design off the tablet, then move to the PC for final editing. Once the design was edited, it would be run on a sample machine such as an inexpensive single head and then reedited. This process would go back and forth till a final sew-out was achieved that could go to production with customer approval. Due to the extremely high costs of digitizing equipment most digitizing was done by specialty digitizing companies. At this time, some digitizing companies might have several artists, several digitizers, several editors and several people just for making sew-out samples. With today's software advances one digitizer is usually responsible for the entire digitizing process from artwork to digitizing to editing to sample sew outs. Sometimes even the machine operator is responsible for the companies digitizing which was unheard of years ago.
At the very beginning of the commercial digitizing era in the 1970s and very early 1980s, most all embroidery digitizing was sent directly to the embroidery machine manufactures (Japan, etc) and was very expensive to have done with long wait times as long as weeks. Due to high demand digitizing companies started appearing in the USA. A complete digitizing station with software, tablet, etc at one time was as much as $100,000. Therefore there were only a few digitizing companies around the USA employing many artists, digitizers, etc. As prices of digitizing equipment slowly dropped, many embroidery companies began doing their digitizing in-house.
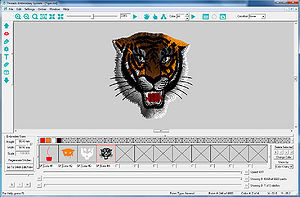
Today, most all digitizing is done on-screen. On-screen digitizing has since replaced the tablet. Digitizers can now just load their images on screen and zoom in and out as needed. They no longer need their artistic counterpart to enlarge and redraw the logo. Software prices have since drastically dropped and a lot of digitizing software is illegally pirated. Unfortunately since then there has been a huge increase in poor quality embroidery sew-outs. Digitizing is an art form. Before a digitizer begins to digitize a logo, they must plan the entire design out in their heads. Much like a game of chess, the digitizer much know exactly where they want to start embroidery and where they want to end. They must plan how to control the movement of the machine to create the least amount of stitches to have the machine embroidery at optimal speeds. This is referred to as Production Digitizing and is more of an old art form usually only practiced by digitizers who have been digitizing for a long time.
Automatic and Manual Digitizing
Some embroidery software packages have Automatic Digitizing features. Automatic Digitizing is the act of taking a computer graphic image and converting it to stitches automatically. Traditionally the stitches are created manually on the computer software, plotting each point in the same direction or same steps that the digitizer would want the machine to run. Automatic digitizing software will automatically plot all the points by vectoring the image. What this means is that the automatic digitizing software will look at the graphic and attempt to find common shapes such as boxes, rectangles, and curves. For example, the letter T generally is made of 2 rectangles. One rectangle goes up and down and another one goes to the left and right. Automatic digitizing software will attempt to find these shapes and then process them into stitches. A digitizer who is manually digitizing an image will do the same thing. As humans we can easily recognize these basic shapes. If a digitizer is manually digitizing an image, they will tell the software where all these points are at by manually plotting all the points. For example, a box, square or rectangle has 4 points one in each corner. Once these basic shapes are plotted or 'digitized', the software can fill them in with stitches.
Automatic digitizing makes its best attempt to finding these shapes in images and then plotting the points. However automatic digitizing software programs generally are not advanced enough to find missing shapes that we as humans can naturally see. For example, cursive writing is written in a way that is constantly flowing when being written even though the lines cross each other. We as humans can see the curves and imagine how the artist wrote the cursive script. However most automatic digitizing software does not have the artificial intelligence to see this the way we do. Most automatic digitizing software also does not produce production embroidery files. This means, the automatic digitizing software will make its best attempt at optimizing points but, almost always an embroidery file created automatically will have a very large percentage more stitches than a file created by a good manual human digitizer. These extra stitches means the machine will take longer to embroidery which ends up lowering profits.
Automatic digitizing also does not do any kind of artwork modifications. When using automatic digitizing software, the artwork must be as clean and as 'embroidery ready' as possible. Anything too small for embroidery will need to be enlarged or removed with a graphics program before processing through the automatic digitizing software. Because automatic digitizing software does not enlarge or remove sections too small for embroidery, the final embroidery product might have many areas with large blobs of stitches. Sometimes the time needed to clean the artwork and then edit the final automatic produced file takes longer than it would just to digitize the design from scratch manually.
Automatic digitizing might work for some designs but the majority of artwork provided by end customers is usually never good enough for automatic digitizing software. It is generally always recommend to have designs manually digitized by a professional digitizer who has been digitizing for a long time and understands Production Embroidery. Automatic digitizing is usually just a 'bells-and-whistles' tool used by embroidery software or embroidery machine salespeople.
Its highly recommended that a legitimate embroidery company find or outsource their digitizing work to a professional with many years of digitizing experience or hire someone with graphic arts skills and train them to become a production embroidery digitizer. The final embroidery digitized file can possibly make or break an embroidery company. Its not recommended to rely solely on automatic digitizing software programs.
Most any embroidery machine that is in tune will embroider a good quality digitized file without problems. However, even the best embroidery machine in the world will struggle with poor quality digitized files. For one time items auto digitizing might be fine but for embroidery going on several garments and for profit, manual digitizing is the only way to go.
Production Digitizing
Production Digitizing is the process of digitizing an embroidery design in a way that will optimize embroidery operations. What this means, is that the digitizer will study a logo for a few minutes before digitizing it. They will determine the optimal way to digitize the logo so that when it is embroidering it takes the shortest routes between points, and the least amount of trims and color changes. The embroidery design should then have fewer stitches and embroider as quickly as possible, allowing the embroidery machine operator to get more garments embroidered in less time.
When an embroidery machine starts embroidering, it takes a few seconds to go from 0 stitches per minute to whatever speed the machine is set to. It takes approximate 6 seconds for a machine to trim a stitch from the time it has to slow down, cut, and then start back up till it gets to the max set velocity. It also takes a few more seconds to do a color change. An embroidery design with no trimmers will embroidery much faster than the exact same logo with the exact amount of stitches but with many trims. A good digitizer will find the closest points between one point and the next so that the stitch between them is so small, it will probably not be visible to the naked eye and therefore not need a trim command.
Production Embroidery Digitizing was very big in the 1980s and 1990s but with the advent of new software programs and with the low cost to get into digitizing, most digitizer do not produce production embroidery designs. It is now very easy for anyone to become a digitizer and therefore quality suffers. The difference between a good digitizer and a bad digitizer is usually if they can produce production embroidery or not. Because most embroidery is done over and over its best to have the design digitized for production embroidery to cut back on time to embroider and thread breaks.
Unfortunately with most digitizing done outside the USA, it is hard to find digitizers who digitize for production embroidery. It is usually recommend to test out about 5 different digitizers to see which one can digitize the same design with less thread breaks, less trims, less stitches and overall the digitizers who digitize designs that embroidery the quickest. In the long run a good production digitizer can make or break an embroidery company. Automatic digitizing is still not at the Production Embroidery level.
Closest Point Letter
Closest Point Letter is lettering that is optimally digitized so that trims are not needed between each letter. The letters are embroidered so that the last stitch of one letter is the closest stitch to the next letter. Usually the spacing between the two letters is so small that the stitch is not noticed. Closest Point Lettering is usually the best to use when digitizing for Production Embroidery.
Cap Embroidery
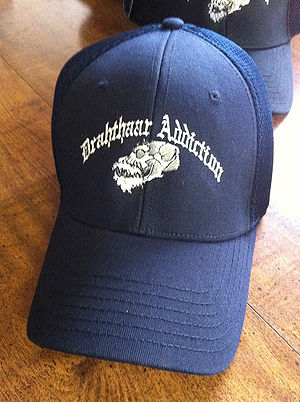
Digitizing for caps can sometimes be difficult. A logo digitized for a cap is digitized differently than any other garment. A 6-panel cap has 6 different panels that make the dome of the cap. In the middle of the cap is usually a seam not found with 5-panel caps. This seam can be difficult to digitizers because too many stitches on top of the seam causes thread breaks, needle breaks, and just poor final quality. Also caps tend to buckle in the center. When digitizing for caps, a digitizer usual has to start digitizing their logo from the center and then work their way out to the sides. This will keep the cap from buckling up.
Puff 3D Embroidery
Puff Embroidery is a type of embroidery where the embroidery looks raises. This effect is usually done with foam. Special digitizing and embroidery techniques are used to crease Puff 3D Embroidery
Pre Digitizing Checklist
The following information is needed by a digitizer to ensure that your embroidery designs are digitized to be the most efficient running and highest quality for Production embroidery. The majority of poor quality designs and thread breaks start at the digitizing process.
- Include clean artwork of ACTUAL IMAGES of what you want digitized. If you do not have the actual image, a cheaper and quicker alternative would be to look online for predigitized designs. Provide the digitizer with the cleanest artwork provided, preferably a vector image. If you know the original font names that will help.
- Include actual sizes of the embroidery design needed. 2 different sizes of designs usually need to be digitized completely differently meaning 2 different sizes are 2 different designs. A jacket back design will not shrink down to a cap logo with even the most expensive software available. A lot of points must be added or removed by hand by the digitizer.
- Let the digitizer know exactly what type of garment or material the design will be embroidered on. For example 6 panel caps are usually digitized completely different than for pique shirts or for denim jackets. The digitizer needs to know this information so they know if they should increase or decrease stitch density, etc.
- Include exact color counts or exact color scheme. If the design artwork has 2 different colors of blue but each color of blue should be the same, the digitizer should know ahead of time. This information may allow the digitizer to digitize the design in a manner that will sew much quicker for Production Embroidery. If the design will be embroidered in different color schemes then the digitizer should also know this ahead of time to allow for multiple color charts.
- If a design is copyrighted or trademarked then an authorization letter must be provided by the owner of the artwork authorizing the embroidery work and digitizing to be done.
Automatic Lettering
Most embroidery software programs come with Automatic Lettering. Automatic Lettering should not be confused with automatic digitizing. Automatic lettering is usually predigitized fonts that have been digitized by experienced digitizers and come with the software package. These are usually safe to use and have been digitized for Production Embroidery. The only downfall of Automatic Lettering is that most lettering is digitized for around the 10MM height size. When enlarging or shrinking the lettering far beyond its intended purpose might cause lots of thread breaks, and/or poor quality. Some embroidery software programs come with several different size versions of the same font. Some embroidery software programs also allow users to modify or create new automatic fonts.
Types of stitches
Some common terminology when talking about embroidery designs or parts of embroidery designs.
- Trim
- A trim stitches
- Normal
- A normal stitch of thread with a needle penetration into the garment on each end
- Column Satin
- Also know as a satin stitch or zig-zag stitch.
- Fill
- A large area filled with stitches all running parallel to each other
Digitizers Disease
Digitizers Disease is a common joke term for a digitizer who has been working too much. In the tablet days of digitizing the computer would make a beep each time a button on the puck was pressed. After pressing the buttons on the puck all day long and listening to the beeps, a digitizer might still hear beeps ringing in their ear after work. Especially when they were working in rooms with several other digitizers all digitizing on the same tablet systems. Thanks to advancements in computing, digitizers can now mute their speakers.
Digitizers also know when they have Digitizers Disease when they start seeing normal shapes or logos in day to day life and think of the optimal ways they would digitize the logos for Production Embroidery.
See also
External links
- Jen's Originals - What does it mean to digitize a logo or design for embroidery?
